


Easter Egg Cheesecake Jars have completely transformed my spring dessert game! These adorable individual treats combine the creamy indulgence of classic cheesecake with festive Easter candy colors that make them absolutely irresistible. I first made these for my family’s Easter brunch last year, and the way my niece’s eyes lit up when I brought them to the table made all the effort worthwhile. The beauty of these jars is their perfect balance of rich creaminess and sweet crunch from the cookie base. They’re surprisingly simple to make but look impressively festive on your holiday dessert table.
Recipe
Print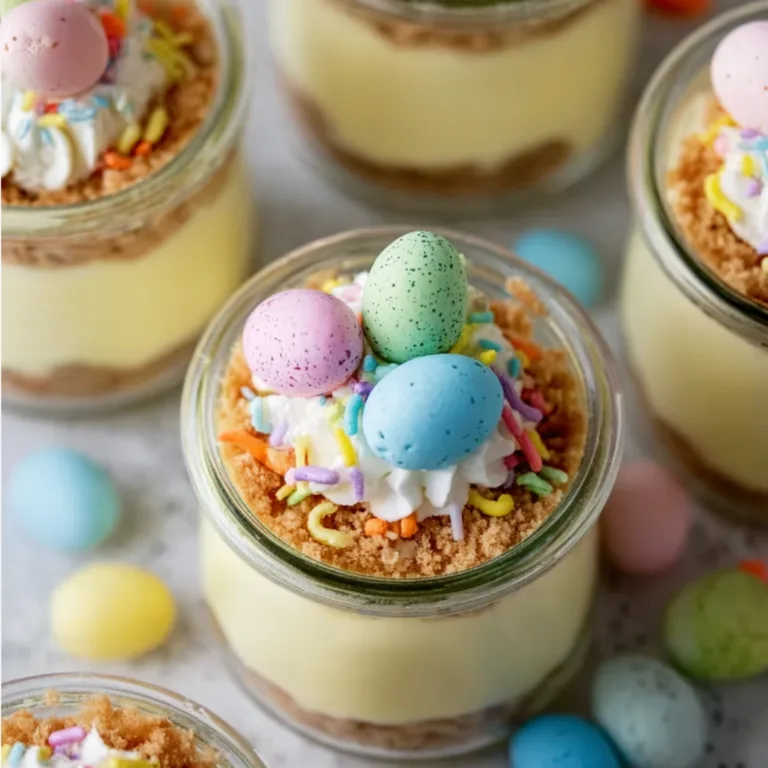
Delicious Easter Egg Cheesecake Jars Recipe
These Easter Egg Cheesecake Jars are creamy, layered, and beautifully festive. With a buttery cookie base, smooth cheesecake filling, and colorful Easter toppings, they’re perfect for quick no-bake desserts.
- Total Time: 1 hour 15 minutes
- Yield: 4 jars
Ingredients
For the Base:
1 1/2 cups crushed cookies (graham crackers or digestive biscuits)
1/4 cup melted butter
For the Cheesecake Filling:
200 g cream cheese (softened)
1/2 cup powdered sugar
1 teaspoon vanilla extract
1 cup whipped cream
For the Layers:
1/2 cup crushed chocolate cookies
1/2 cup mini chocolate eggs
Optional:
Food coloring (for pastel layers)
Whipped cream for topping
Instructions
1. Mix crushed cookies with melted butter and press into the bottom of jars.
2. In a bowl, beat cream cheese, powdered sugar, and vanilla until smooth.
3. Fold in whipped cream to create a light cheesecake filling.
4. Optional: divide filling and add food coloring for pastel layers.
5. Layer cheesecake mixture over the cookie base.
6. Add crushed cookies and mini eggs between layers.
7. Repeat layers until jars are filled.
8. Top with whipped cream and extra Easter candies.
9. Chill for at least 1 hour before serving.
Notes
Use clear jars for a красив layered look.
Chill well for best texture.
Swap cookies with Oreos for extra flavor.
Perfect for parties and individual servings.
- Prep Time: 15 minutes
- Cook Time: 0 minutes
- Category: Dessert
- Method: No-Bake
- Cuisine: American
- Diet: Vegetarian
Why You’ll Love These Easter Egg Cheesecake Jars
Perfect Make-Ahead Dessert Solution
These charming little jars are a total lifesaver when you’re juggling multiple dishes for Easter gatherings. I love that I can prepare them up to two days ahead and simply pull them from the refrigerator when dessert time arrives. The individual portions eliminate the need for messy cutting and serving, making them ideal for buffet-style meals. The combination of buttery cookie crust, velvety cheesecake filling, and colorful Easter candy toppings creates a delightful textural experience in every spoonful. Plus, they transport beautifully if you’re taking them to a family gathering across town!
Customizable for Everyone’s Taste
One of my favorite aspects of these Easter Egg Cheesecake Jars is how easily they adapt to different preferences. You can customize the cookie base using anything from graham crackers to vanilla wafers or even chocolate sandwich cookies for a more decadent foundation. The filling itself welcomes flavor variations—try adding lemon zest for brightness, swirling in berry compote for a fruity twist, or incorporating white chocolate for extra richness. I’ve even created a “build your own” station where guests can add their preferred toppings like pastel M&Ms, crushed mini eggs, or colorful sprinkles, which is always a huge hit with both kids and adults!
Essential Tips & Tricks
Getting the Perfect Texture
The secret to achieving that dreamy consistency in your cheesecake filling lies in a few simple techniques. Always start with room temperature cream cheese—I leave mine out for at least an hour before mixing. This prevents those frustrating lumps that can ruin the silky texture we’re after. When incorporating the eggs, mix on low speed just until combined; overmixing introduces air that can cause cracks and an uneven texture. For an extra-smooth result, I like to strain my mixture through a fine-mesh sieve before pouring it into the jars. This removes any tiny bits that didn’t fully incorporate and ensures each bite is velvety perfection.
Stunning Presentation Ideas
The visual appeal of these Easter Egg Cheesecake Jars is half the fun! I recommend using clear glass containers to showcase the beautiful layers. Mason jars work wonderfully, but wineglasses, small trifle dishes, or even clear plastic cups for kid-friendly events are great alternatives. Create a stunning color gradient by tinting portions of your cheesecake mixture with food coloring—pastel pinks, blues, and yellows capture that Easter vibe perfectly. For an elegant finishing touch, pipe a swirl of whipped cream on top using a star tip, then nestle a chocolate egg or bunny into the cream. Consider adding edible flower petals or mint leaves for a fresh, springtime feel that will have everyone reaching for their phones to snap a picture!
Serving Ideas & Creative Variations
Complementary Flavors and Pairings
These Easter Egg Cheesecake Jars shine even brighter when served with thoughtful accompaniments. I love offering a small pitcher of warm caramel sauce for drizzling, which adds a gorgeous amber contrast to the pastel colors. Fresh berries—particularly strawberries and blueberries—provide a welcome tartness that balances the rich cheesecake. For an adult gathering, consider serving alongside glasses of chilled Moscato or champagne with a splash of elderflower liqueur. The effervescence cuts through the creamy dessert beautifully. Coffee is another classic pairing; a rich espresso or even a spiced chai creates a lovely temperature and flavor contrast that elevates the entire dessert experience.
Dietary Adaptations That Don’t Sacrifice Flavor
I’ve experimented with numerous variations to accommodate different dietary needs, and I’m happy to report these jars can be wonderfully inclusive! For lactose-sensitive guests, lactose-free cream cheese and coconut cream work surprisingly well. A gluten-free crust is simple—just substitute gluten-free cookies or graham crackers in the base. For a lighter version, Greek yogurt can replace up to half the cream cheese, adding a pleasant tanginess while reducing calories. Vegan guests will appreciate a cashew-based cheesecake filling (soaked cashews blended with coconut cream and a bit of lemon juice) paired with vegan cookies for the base. The colorful toppings can be adjusted too—look for naturally colored candies or use fresh fruit for a wholesome alternative.
Storage & Troubleshooting Guide
Keeping Your Cheesecake Jars Fresh
Proper storage is crucial for maintaining the perfect texture and flavor of your Easter Egg Cheesecake Jars. Once assembled, cover each jar tightly with plastic wrap or the jar lids if using mason jars. They’ll keep beautifully in the refrigerator for up to four days, though the crust may soften slightly over time. If you’re making them more than two days in advance, consider waiting to add certain toppings like whipped cream or cookies until just before serving. For longer storage, these jars freeze surprisingly well—just thaw overnight in the refrigerator before serving. I’ve found that placing a paper towel over the jars before securing the lid helps absorb any excess moisture during thawing, keeping your desserts picture-perfect.
Fixing Common Cheesecake Issues
Even experienced bakers encounter challenges sometimes! If your filling seems too runny, refrigerate it for 30 minutes before assembling the jars—this helps it firm up nicely. For lumpy filling (my personal nemesis!), warm the cream cheese in 10-second microwave bursts, then beat thoroughly before proceeding. If your cheesecake develops a slight weeping or separation, whisk in a teaspoon of cornstarch before assembling. Crust turning soggy too quickly? Try brushing it with melted white chocolate and allowing it to set before adding the filling—this creates a moisture barrier. And if your colorful toppings begin bleeding into the cheesecake, freeze the filled jars for 20 minutes before adding the final decorative elements, which helps “set” the surface and prevents color transfer.
Frequently Asked Questions
Can I make Easter Egg Cheesecake Jars without a springform pan?
Absolutely! That’s the beauty of this recipe—no springform pan needed. Simply layer the ingredients directly in jars or glasses for individual portions that are both adorable and convenient.
How far in advance can I make these?
You can prepare these jars up to 3 days ahead. Store them covered in the refrigerator, but add any whipped cream toppings or delicate garnishes just before serving.
Can I use store-bought cookie crumbs for the base?
Yes! Pre-made graham cracker crumbs or crushed cookies work perfectly. This saves time without sacrificing flavor or texture in your dessert.
Are these suitable for freezing?
Definitely. These jars freeze beautifully for up to 1 month. Thaw overnight in the refrigerator and add fresh toppings before serving.
What’s the best way to create colorful layers in Easter Egg Cheesecake Jars?
Divide your cheesecake mixture into separate bowls and add different food coloring to each. Layer them carefully in the jars, or swirl gently with a skewer for a marbled effect.
Final Thoughts
These Easter Egg Cheesecake Jars have become my signature spring dessert, bringing smiles and second helpings wherever I serve them. The combination of creamy cheesecake, crunchy base, and playful Easter candy creates a dessert that’s both sophisticated and fun. What I love most is watching guests discover the hidden treasures as they dig their spoons through the colorful layers. Whether you’re hosting an elaborate Easter feast or just want to bring a special treat to the family gathering, these portable little jars of joy are sure to become a tradition worth repeating. Find more seasonal inspiration for your Easter Egg Cheesecake Jars on Pinterest.